Posted by Piyush February 18th, 2013 11 Comments »
Now a days most 3rd party software require Microsoft .NET Framework installed in your system. The required .NET Framework version might be different for different software and the most required .NET Framework version is 3.5 which comes preinstalled in Windows 7.
If you are using Windows 8 and when you trying to install any software which required .NET Framework 3.5 then you might face a problem. Windows 8 doesn’t come with default .NET Framework 3.5 version. It comes with the latest .NET Framework 4.5 version preinstalled.
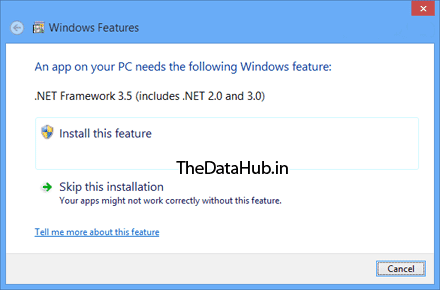
When you try to open a program requiring .NET Framework 3.5, you get following message:
An app on your PC needs the following Windows feature:
.NET Framework 3.5 (includes .NET 2.0 and 3.0)
There are 2 options given to install the .NET Framework version or to skip the installation. If you decide to install it, Windows try to connect to Internet to download the setup files of .NET Framework 3.5.
That’s amazing because Windows 8 setup has contains .NET Framework 3.5 setup files but still Windows try to connect to Internet. It would have been better and easier if Windows 8 installed the .NET Framework 3.5 without Internet connection just like it does for other Windows components such as Windows Media Player, Internet Explorer, etc which can be installed or uninstalled using “Programs and Features” in Control Panel.
If you don’t have an Internet connection or if you don’t want to waste time and bandwidth in downloading the setup files, here is a way to install .NET Framework 3.5 offline in Windows 8.
In this tutorial, we will tell you how to install .NET Framework 3.5 in Windows 8 without Internet connection. You can install it offline with the help of a single command in cmd. This method requires Windows 8 setup disc or ISO file so make sure you have Windows 8 setup files with you.
So lets start the tutorial:
Step 1.
First you will need to copy Windows 8 setup files to your hard disk.
If you have Windows 8 setup ISO copied in your system,
you can mount it by right-click on it and select “Mount” option or
you can extract its content using 7-Zip.
If you have Windows 8 setup ISO copied in your system,
you can mount it by right-click on it and select “Mount” option or
you can extract its content using 7-Zip.
or
If you have Windows 8 setup disc and don’t want to copy its content, its ok. Just insert the disc in your CD/DVD drive so that Windows can access its content.
Step 2.
You need the sxs Folder placed in sources named folder in Windows 8 setup disc.
Now open Command Prompt as Administrator as mentioned here and then provide following command and Enter the path of sxs Folder:
Now open Command Prompt as Administrator as mentioned here and then provide following command and Enter the path of sxs Folder:
Dism /online /enable-feature /featurename:NetFx3 /All /Source:F:\sources\sxs /LimitAccess
Remember Here “F:” represents the CD/DVD drive letter in your system which contains Windows 8 setup disc.
Replace it with the correct drive letter according to your system.
If you extracted Windows 8 setup files in a directory, replace F:\sources\sxs with the correct path.
If you extracted Windows 8 setup files in a directory, replace F:\sources\sxs with the correct path.
Step 3.
when you execute the above mentioned command, Windows will start installing .NET Framework 3.5 in your system and it’ll not require Internet connection.
It’ll take a few minutes and you’ll get a message that the operation completed successfully.
Step 4.
That’s it. Now you have installed .NET Framework 3.5 in Windows 8 without using Internet connection.
If this article is helpfull to you please like us on faceboo and subscribe to get updates from us.
If you have any problem when you try this please comment bellow we give you reply with your solution.
If this article is helpfull to you please like us on faceboo and subscribe to get updates from us.
If you have any problem when you try this please comment bellow we give you reply with your solution.


0 comments :
Post a Comment